You are using an out of date browser. It may not display this or other websites correctly.
You should upgrade or use an alternative browser.
You should upgrade or use an alternative browser.
Hillside Birchover
- Thread starter Grainfoot
- Start date
Hence why I was trying to get quotes for someone to do this?!And presume if I forsake the ‘curly cable’ solution to rear tailgate grommet, I would simply drill into pop top, install gland etc before entering wire at rear of canvas current Velcro and then drilling into top of rear wardrobe unit?
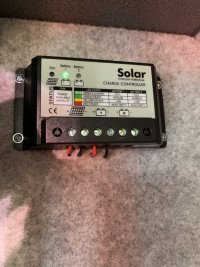
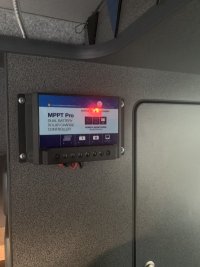
Hillside originally installed mine in the rear wardrobe but I was never happy with it there as it always seemed very warm. When my first panel failed a few years ago I went for an MPPT controller and installed it on the outside of the wardrobe instead - it uses the original cabling that Hillside installed but with a hole drilled through to the outside of the cabinet (if memory serves there is a false panel in the wardrobe and I drilled the hole behind that such that there is no cabling left in the wardrobe).Has anyone with a Hillside Birchover got a solar controller factory or retro installed by Hillside? I'm interested in where they actually fit it.
Any pictures at all?Hillside originally installed mine in the rear wardrobe but I was never happy with it there as it always seemed very warm. When my first panel failed a few years ago I went for an MPPT controller and installed it on the outside of the wardrobe instead - it uses the original cabling that Hillside installed but with a hole drilled through to the outside of the cabinet (if memory serves there is a false panel in the wardrobe and I drilled the hole behind that such that there is no cabling left in the wardrobe).
Post 11 of the following thread kindly shows @Davenjo SCA Hillside solar wiring routing
Post in thread 'How've You Installed Your Solar Panel?'
How've You Installed Your Solar Panel?
Post in thread 'How've You Installed Your Solar Panel?'
How've You Installed Your Solar Panel?
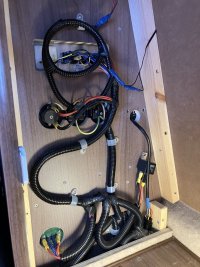
@Chris1983 If you post a clear pic of the wiring behind the side of your rear wardrobe (4 screws in the corners hold the carpeted panel on) then I’ll try and guide you as to where you can wire to.
Will sort!@Chris1983 If you post a clear pic of the wiring behind the side of your rear wardrobe (4 screws in the corners hold the carpeted panel on) then I’ll try and guide you as to where you can wire to.
All and any help appreciated
Ok, bottom left of your pic is your CBE fuse distribution. The bottom wire, which can’t be seen on your photo, but can on the one I’ve attached to this post is where you can connect your Solar controller output positive wire. It’s the 40A feed from the front and the one with the yellow spade terminal on my pic.
So just pull it off, add a short wire with a single spade to double spade, connect back up and wire the solar output controller positive to the spare spade.
For the solar controller output negative; in the rear offside quarter panel (accessed through the lift out cover in the bottom of the wardrobe, you will find a factory earth with other GND connections. Connect your solar output negative connection onto here.
Run the solar cable as per the pics by @Davenjo that I linked to in post 265 of this thread and connect the positive and negative to the solar controller input connections. Job done.
I’d put an additional cable tie base or two on the roof at the rear to anchor the cable from the solar panels that you are going to fit to the rails as the distance is quite far for an unsupported cable IMHO.
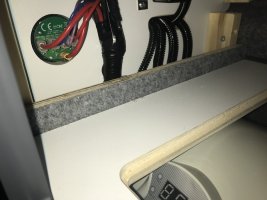
You may even be able to fit the solar controller in the central rear shelf to hide it (haven’t measured it so don’t know off the top of my head if there is enough room or not) if you don’t want to mount it in the cupboard or externally.
Hope that helps.

This is very very helpful.
Do you (or others) know how I get from entry into pop top canvas Velcro down into the ‘wardrobe’ unit? Is it literally just drilling a hole?
As was said the £700 quote does seem steep if this is what gets done. I had presumed wiring needs to be worked all the way to the leisure directly!
Bw
Do you (or others) know how I get from entry into pop top canvas Velcro down into the ‘wardrobe’ unit? Is it literally just drilling a hole?
As was said the £700 quote does seem steep if this is what gets done. I had presumed wiring needs to be worked all the way to the leisure directly!
Bw
I also have a standalone shading/bypass diode in the mix (rear cable entry on the panel so no room on the actual panel?) - this is installed between the panel and controller - Hillside put this behind the rear central shelf.Ok, bottom left of your pic is your CBE fuse distribution. The bottom wire, which can’t be seen on your photo, but can on the one I’ve attached to this post is where you can connect your Solar controller output positive wire. It’s the 40A feed from the front and the one with the yellow spade terminal on my pic.
So just pull it off, add a short wire with a single spade to double spade, connect back up and wire the solar output controller positive to the spare spade.
For the solar controller output negative; in the rear offside quarter panel (accessed through the lift out cover in the bottom of the wardrobe, you will find a factory earth with other GND connections. Connect your solar output negative connection onto here.
Run the solar cable as per the pics by @Davenjo that I linked to in post 265 of this thread and connect the positive and negative to the solar controller input connections. Job done.
I’d put an additional cable tie base or two on the roof at the rear to anchor the cable from the solar panels that you are going to fit to the rails as the distance is quite far for an unsupported cable IMHO.
You may even be able to fit the solar controller in the central rear shelf to hide it (haven’t measured it so don’t know off the top of my head if there is enough room or not) if you don’t want to mount it in the cupboard or externally.
Hope that helps.
View attachment 230225
I don’t know what a bypass/ shading diode is?! SorryI also have a standalone shading/bypass diode in the mix (rear cable entry on the panel so no room on the actual panel?) - this is installed between the panel and controller - Hillside put this behind the rear central shelf.
They protect the panel when, for instance, some of the cells are in shade.I don’t know what a bypass/ shading diode is?! Sorry
@Davenjo will hopefully be able to confirm, but after following the routing of the cable as per the link then yes I would say so.This is very very helpful.
Do you (or others) know how I get from entry into pop top canvas Velcro down into the ‘wardrobe’ unit? Is it literally just drilling a hole?
As was said the £700 quote does seem steep if this is what gets done. I had presumed wiring needs to be worked all the way to the leisure directly!
Bw
@Chris1983
With regard to the bypass/shading diodes ask the supplier of the solar panel kit if they are included or necessary on the panels you are getting.
With regard to the bypass/shading diodes ask the supplier of the solar panel kit if they are included or necessary on the panels you are getting.
One of my picture from the thread linked above shows the cable from where it comes inside the velcro, going through a hole into the void behind the rear central shelf (where I have the shading diode). From here it's is simply routed behind the cabinets to the void behind the panel in the wardrobe.@Davenjo will hopefully be able to confirm, but after following the routing of the cable as per the link then yes I would say so.
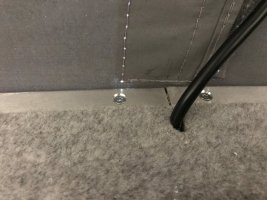
I'm trying to find an old photo but assume Hillside either used one of the existing cable entries in that area, i.e. void behind panel in wardrobe shown above, or drilled a new one.Did you drill into wardrobe cupboard? Is that how to her wire heads into there?
Similar threads
- Replies
- 61
- Views
- 2K
- Replies
- 3
- Views
- 482
- Replies
- 4
- Views
- 1K
- Replies
- 18
- Views
- 2K

