How to fit a DC-DC / battery-to-battery charger kit

Best way round that is to fit a low wattage solar panel on the dash. It will maintain the battery without reaching the switching threshold of the DC-DC charger.
Ah Ok that’s a good idea.
May I just ask, as this may be of interest to other camper-van owners of a certain age who don’t use the vehicle during the winter months, is it not a good idea, whilst the vehicle is laid up, to occasionally charge the batteries via a charger on the engine battery which in turn at the same time via the BtoB will charge the leisure battery as well?
I must confess we have also done this whilst out camping on hook up when we have depleted the engine battery by having the cab radio on.
Wish I had stuck to my old T5 now, I understood how that worked.
 
Best way round that is to fit a low wattage solar panel on the dash. It will maintain the battery without reaching the switching threshold of the DC-DC charger.

How would this be electrically connected to the van battery ?

Thanks,

Pete
 
what size low wattage
Best way round that is to fit a low wattage solar panel on the dash. It will maintain the battery without reaching the switching threshold of the DC-DC charger.
what size solar panel would you recommend
 
I have a 20w sunsei panel I used to leave on the dash of my land cruiser and it had a very small regulator and it plugged into a socket.
 
Ah Ok that’s a good idea.
May I just ask, as this may be of interest to other camper-van owners of a certain age who don’t use the vehicle during the winter months, is it not a good idea, whilst the vehicle is laid up, to occasionally charge the batteries via a charger on the engine battery which in turn at the same time via the BtoB will charge the leisure battery as well?
I must confess we have also done this whilst out camping on hook up when we have depleted the engine battery by having the cab radio on.
Wish I had stuck to my old T5 now, I understood how that worked.

This won't work with most DC-DC chargers as they are ignition controlled, unlike a VSR based system.
 
This won't work with most DC-DC chargers as they are ignition controlled, unlike a VSR based system.
Hi, on the Sterling it is fully automatic and does not require an ignition connection. (But it does feel wrong to put one battery on charge and watch it charge a second at the same time.)
 
Last edited:
Hi, on the Sterling it is fully automatic and does not require an ignition connection. (But it does feel wrong to put one battery on charge and watch it charge a second at the same time.)
The nice thing about the Redarc unit and others that @travelvolts supplies is that they have a control wire and the kit supplied allows you to use the original relay control wire to control the charger, so that when start-stop kicks in the unit temporarily stops charging and then resumes a few seconds after the engine restarts. This allows the vehicle to operate as designed with the benefit of a better charging profile of the leisure batteries.
 
Thanks @Loz for making this mod easy and simple.

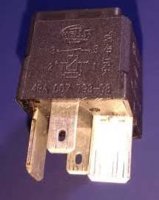
My observations: In (MY2018) panel van the split charge relay (designation "100") is installed into a socket, so no ring terminals available as in picture of Step 4 above.
A possibility is to take advantage of the socket for charger connections. The challenge is to find male connectors of same size as relay’s main pins. Their size is approx. 9.5 mm (width) x 1.2 mm (thick) and about 14 mm long. The relay control pins are just standard 6.3 mm pins.
EDIT: relay designation (instead of Amp-rating)
Split_charge_relay_T6_2018.jpg
 
Last edited:
This is a key point that manufacturers like Sterling, Ctek and Ring actually miss, and so surely lose out on a huge market opportunity.
A plug-and-play solution using existing connectors would have a far greater appeal than a spaghetti birdsnest,
plus it has the advantage of no modifications, hence no warranty issues, and reversion to standard by simply unplugging the B2B and replacing the relay.
The relay socket has every connection we need - it has the feed from the alternator/starter battery, the feed to the leisure battery,
chassis ground and a switching signal. Plugs can be made from spade connectors and epoxy, or by 3D printing, or as a one-off could
be made by hacking a spare relay, removing the relay guts and wiring directly to the base - but you would think that surely someone
already produces a relay-style plug?
Cheers
Phil
PS I think the '100' is just a part designation, I dont think its a 100 amp relay.

 
Last edited by a moderator:
So perhaps one needs to purchase a relay and break it apart, remove the relay and solder the charger cables to the inside and seal it up turning it into a connector.
 
Thanks @Loz for making this mod easy and simple.

My observations: In (MY2018) panel van the split charge relay (100A) is installed into a socket, so no ring terminals available as in picture of Step 4 above.
A possibility is to take advantage of the socket for charger connections. The challenge is to find male connectors of same size as relay’s main pins. Their size is approx. 9.5 mm (width) x 1.2 mm (thick) and about 14 mm long. The relay control pins are just standard 6.3 mm pins.
View attachment 24657
I have searched high and low for such terminals and have come to the conclusion that they don't exist. I have sourced some copper strip of the correct dimensions and will be making the required terminals in due course. I am just so busy at the moment I haven't had the time to do it yet.
 
The RS ones look right, for myself I'd happily use those but I appreciate that as a dealer, the spec needs more headroom.
I imagine the limitation is the tin plated contact area hence the 23A. Maybe they're available plated?
Otherwise looks like your copper strip 9.5mm x 1.25mm is the way to go.
If someone can cad the housing, there are loads of online print shops. 90-degree exit would be good
afro.gif
I think, given that the RS ones are only available in the 1000s I will stick with the copper strip!
 
Back
Top