OEM Webasto Auxiliary Heater To Parking Heater Upgrade

I do not know why, i do not have access to the link from your post. I am banned to that site.
Works for me :geek:
The site probably locks out requests coming through other sites (T6F) classifying them as robots, so try start fresh, reselecting brand and model and go from there.
 
I can get to it straight from the link in the post. Wonder if it’s a country specific thing, maybe try a VPN?

Edit: Ah wait, there is a site problem, I’m coming across the same when I dig down
 
This also might be very helpful to some retrofitting people. Unfortunately it is in Dutch but with GOOGLE TRANSLATOR it can be read in any language.

Installation instructions from Webasto & Eberspächer. ---> Download
 
Try different web browsers. It worked for me.
Also sometimes I have noticed that accessing from the same public IP it works on my mobile phone and doesn't work on my desktop PC.
 
I am also looking how to wire the overhead control panel. And maybe, after that, i can code with vcds the overhead control panel and the webasto unit with other version of flash. I think, the webasto is fizically the same. Only different software version.
Do you know where it is the overhead control panel wired? CAN i think .....but where exactly can be found?

Thanks
No flashing is required on T5.1, just Webasto timer addition.
One of forum members has done that already.
 
No flashing is required on T5.1, just Webasto timer addition.
One of forum members has done that already.
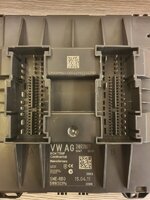
I think the webasto is the same, but the mainboard of it is different. Mine is 7E0815071B.
 
20201122_172930.jpg
So Robert, where to stick those 2 CAN wires coming from the J702 Overhead Control Panel? It says 73b, on the diagram. I have no idea.
 
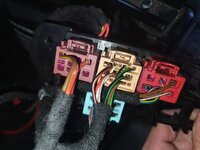
T73b = white connector - pins 21, 20. There are mating wires (orange/brown, orange/green). Pin numbers should be marked on connectors.
1606062621759.png
 
You just need to add your new unit in CAN Gateway(19) INSTALLATION LIST and then verify its own coding but default coding should work anyway.

Today I managed to install all components on my T6 MY19 LHD
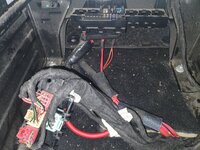
Overhead panel wire went through the left side of the roof cover, then A pillar, then down under the floor cover, directly under the driving seat.
All connections made in T17p connector under the driver's seat:

- Telestart control white/green --> T17p/1
- Overhead Display&Panel Connivence CAN-l orange/brown --> T17p/2
- Overhead Display&Panel Connivence CAN-h orange/green --> T17p/3
- Telestart & Overhead Display&Panel DC +12V --> T17/p read/yellow thick wire
- Telestart & Overhead Display&Panel GND --> T17/p brown thick wire

In Gateway (19) Installation List Display Control Roof (6E) has been enabled.

Status after all was done:
- Overhead Display&Panel (6E) captured settings from the system: Language, time. No fault codes. Dimming function works well. Panel lights up when doors opened and goes off after few seconds when doors closed. Only functions available: set date, display mode: time or date. Other buttons: Timer, Mode - no actions/response.
Adaptation and coding - default. No changes made.
- Aux Heater (19): no fault codes. Coding 5101. Works still as before. Starts with engine and warms up coolant while the engine temperature below 80C and outside temperature below lower threshold ( 8C in my case / 5C as default). Remote control from Telestart responds with steady red (off button) and steady green (heat button).

One thing is to be done: to flash Aux Heater Control Unit with FL_7E0963272B__0009.frf file.
I plan to do it next week, as I have to drive to another town in Germany to a nice fellow with VCP.

I'm a bit concerned that Timer and Mode buttons give no features, while before connecting to the CAN with power only they provided response with timer and mode settings,
I want to test that everything is right and as expected before going to re-flash.

Should I expect some functions from Overhead Panel before flashing?
 
Finally!
Today I did the re-flashing with the guy in Germany. He has ODIS-E, VCDS and VCP. Flashing was done with ODIS-E and it took just 10 minutes without any hassle.
Everything went smooth and as expected.
Remote control is alive and working as configured. Overhead panel is alive and all features are available!
I'm super happy and indeed I have to say Great Thanks to @Robert, @mmi and the entire community!
You did great job posting all the details and providing almost instant support to amateur retrofitters, like me.

All instructions posted here (I followed (B)-case ):
If I have captured this correctly there are two different ways to turn T6 engine supplementary engine heater to a remote controlled parking heater.

(A) - Reprogram the heater using tools+firmware provided by Webasto and use a remote control receiver + remote controller packaged by Webasto. The package+installation were described in thread https://www.t6forum.com/threads/auxiliary-heat-upgrade.5029/ and also on pages 1-2 of this thread.

-------------------------- or --------------------------

(B) - Use VW OEM components and firmware to implement/add parking heater functionality on T6 (as from the factory on the vans in Nordic countries) as described on pages 4-5 of this thread ---> Webasto Auxiliary Heater - customizing .

A recap of the procedure below. Credits: @wolny and @James fitch

For this functionality early T6s have remote control receiver 5Q0 963 513 A (with oval remote controller). From MY2017 onwards remote control receiver 3Q0 963 513 is used (square remote, as in the picture --> Webasto Auxiliary Heater - customizing )

The actual heater is identified on front door sticker with part# 5Q0.010.014.D (also the Nordic ones). However, when read (from controller 18) by diagnostic tool the identifier is HW: 7E0 963 273A or 7E0 963 272 A/B (Nordic ones).


It seems that @wolny also has Climatronic A/C so based on the posts above the following steps are needed when using OEM components for a van equipped with Climatronic:

(1) Reprogram the Webasto controller using ODIS or VCP with VW OEM firmware "FL_7E0963272B__0009.frf", which is available at ---> Webasto Auxiliary Heater - customizing

(2) Change Webasto coding to 5001 (Remote+Fresh air blower control via CAN) --> Webasto Auxiliary Heater - customizing

(3) Add a wire from remote control receiver (5Q0963513A or 3Q0963513) connector [A2_pin_2] to red connector [T17p_pin_1] (under left seat; there should be a green/white wire on Webasto side of the connector). Also wire permanent +12V, ground, aerial to remote control receiver. See details in the schematics ---> Webasto Auxiliary Heater - customizing and in the picture ---> Auxiliary heat upgrade

(4) If not already done, pair the remote with the receiver as described in (under T91) ---> Fuse Layout Under Nsf Seat
When remote is paired/communicating pressing OFF results a steady red light on the remote. On a non-paired remote pressing OFF flashes red.


I do hope recapped this correctly, any wrongs or hiccups, please correct!

and in this thread are 100% valid for T6 MY19 Multivan. No surprises. No side effects so far.
After re-flashing several ECU (Brakes, A/C and Information System) were full of fault codes due to blocked CAN-bus during re-flash process.
All fault codes were erased and never appeared again.

I will make some photos tomorrow in daylight to show the setup and how it finally works.

Many thanks again!
Cheers!

P.S. VCP German guy shared some bad news for VAG retrofiters.
Starting from MY20 many VAG platforms will be converted to online HASH based authentication for adaptation/coding access and most of the useful tips will be unavailable due to the access restrictions. I didn't checked this somewhere else and just share it with you "as-is".
 
...
P.S. VCP German guy shared some bad news for VAG retrofiters.
Starting from MY20 many VAG platforms will be converted to online HASH based authentication for adaptation/coding access and most of the useful tips will be unavailable due to the access restrictions. I didn't checked this somewhere else and just share it with you "as-is".
That is absolutely correct but this is result of VW switching from PQ25 electronic platform on T6 to its newest baby MQB platform on T6.1.
A lot of things on MQB platform is done differently but from the retrofitting perspective, although much more difficult, it opens completely new doors of possibilities.
 
Back
Top