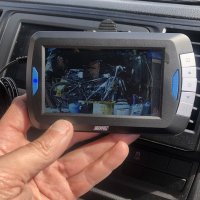
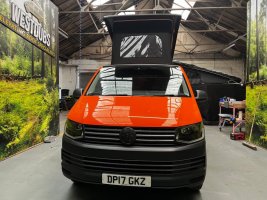
That should be linked to a train air horn for maximum entertainment!A little novelty item, but it makes me chuckle every time I see it…
View attachment 198957
View attachment 198958
You are using an out of date browser. It may not display this or other websites correctly.
You should upgrade or use an alternative browser.
You should upgrade or use an alternative browser.
What Have You Done To Your Van Today?
- Thread starter Daneeyre
- Start date
-
- Tags
- mod modification mods retrofit
Funny you should say this, I did mention to someone about fitting one for just the right momentsThat should be linked to a train air horn for maximum entertainment!
Ajay, great post, I’ve just had a tow bar fitted because we had a rack already and sure enough we can’t open the tail gate…. It’s a Thule velocompact 927. I can see the bungs, how much did you cut off and did you angle the cut or just vertical? Any pics or info would be greatI managed to give my van a tow bar mounted bike rack that now folds down to allow the tailgate to open properly. I've got a Thule Easyfold XT2 which, as the name indicates, folds to the size of a medium sized suitcase when not in use. Because it is so portable and easy to store when folded up and in it's zip up cover, I have always been willing to put up with the inconvenience on not being able to open the back when we're using the rack unless we either unload the bikes and then take it off or, as we did most of the time during our recent South of France road trip, just lift the whole thing off (ie. bikes 'n all) and drop it back on when we needed to. However, the novelty of doing that started to wear off as it can sometimes be awkward to place it in exactly the right spot to enable it to lock down properly on the tow ball. Anyway, I saw a video on YouTube made by a couple under the name of 'California Time' where they simply took out to thick plastic bungs which doubled as the stops for tilt mechanism on the rack. At first, I wasn't keen on their idea as I reckoned that the bungs probably contributed to the strength of the pivot point but when I got to take it apart, I realised that you could cut them down to a size which allowed the rack to fold enough but still maintained the structural integrity. An hours work and job done - I've just been out (in the rain) to test it and the tailgate clears the rack easily. I just need to make a prop of some kind now otherwise all the weight will rest on the handlebars of the outside bike when it's folded. A 27" length of roofing batten with a V cut into one end should do nicely but that's for later. If anyone's interested, I can explain some more and take some pics.
Did not realise there was so much to tyre pressure. Did not like 40/38. Got the F1 Mercedes bounce. Still a quiet, comfortable ride but a discernable bounce. Going up to 42/40 and see where that gets me.Liking @dcpen43 so I can try! See if some of the thuds disappear!
Last edited:
Not intentionally, but the small table tucks neatly under the larger tableAnd when I want to use the Captains chair and have that cup of tea I made a little swivel table out of two computer screen arms
View attachment 199017
View attachment 199018

Busy few weeks researching, buying and planning. Not complete yet as waiting on brackets for the lights in front of the rack rather than on top, but worst part (drilling holes in the roof) is done and cables pulled, and it’s all watertight thankfully. Once the lights are up I’ll mount up the solar panel which concludes the exterior work and then finally terminate the panel wiring, secure all the cables, and generally just get everything back together internally. Hopefully with no subsequent rattles! As always the forum has been an essential source of study.


How about this with an Amazon Spaceman projectorA little novelty item, but it makes me chuckle every time I see it…
View attachment 198957
View attachment 198958

A little novelty item, but it makes me chuckle every time I see it…
View attachment 198957
View attachment 198958
Where did you get that from please?A little novelty item, but it makes me chuckle every time I see it…
View attachment 198957
View attachment 198958
Washed it. Trying to get rid of 3000miles of French and Italian dead flies is a nightmare!
It was nice and dull this morning when I started, and then the sun decided to show making streaks on the van straight away. I really hate washing cars and vans!
Looks a lot better now though.
It was nice and dull this morning when I started, and then the sun decided to show making streaks on the van straight away. I really hate washing cars and vans!
Looks a lot better now though.
2 Pcs Car Cigarette Lighter Plug Cover Cap Eject Button Dust Cover,Car Engine Start Stop Button Cover Zinc Alloy Protective Cover https://amzn.eu/d/0RX3JKbWhere did you get that from please?
One thing I will say is be carefull when putting the cover on as you have to be very precise as there is virtually no room around it with the raised trim
Last edited:
Operation 'Titan Black' continues...today's replacement, seat belt clips
View attachment 198753 View attachment 198754
Where are you getting the bits from? want to swap mine over
niceSpent the day sound deadening the final part of the van, as well as wiring the towbar electrics and fitting 12v and USB sockets (via ignition switches). I didn’t like that you could see the wiring under the seats with the OEM plastic seat covers so made some cover plates. Really happy with the outcome:
View attachment 198982
View attachment 198983
View attachment 198984
View attachment 198985
I did mine and well worth the effort especially as I am running BFG AT Tyres really has made a massive difference with road noice in the cab
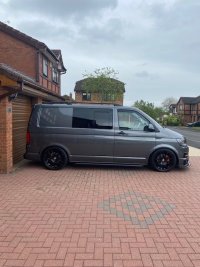
I've been Steved, 70mm down @CRS Performance
Drives beautifully now, thanks Steve
Apologies for the mucky van, it was a 250 mile round trip!


Drives beautifully now, thanks Steve
Apologies for the mucky van, it was a 250 mile round trip!


Looks like in that second photo the rears have some mega lift kit in there! After looking good though!I've been Steved, 70mm down @CRS Performance
Drives beautifully now, thanks Steve
Apologies for the mucky van, it was a 250 mile round trip!
View attachment 199303
View attachment 199305
View attachment 199307
Similar threads
- Replies
- 0
- Views
- 625
- Locked
- Replies
- 0
- Views
- 174


