What Have You Done To Your Van Today?

After replying to a fellow forum members question today, I thought I would install the same, as I bought a new end cap, kept safe in my "spares box", since 2023!
Item 21:


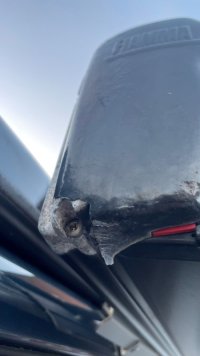
I bought the end cap, as mine was suffering from paint peel, which apparently affects most F45S' (@Ed Webb - you replaced yours yet?):
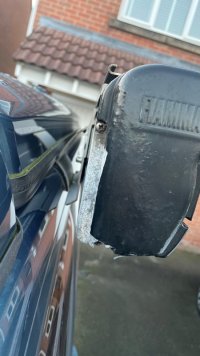
Fiamma F45S endcap - flakey paint 2.jpg

I tried to remove the 3 screws (2 visible & 1 hidden under the windy out bit).
Both outer screws wouldn't budge and I ended up rounding off the heads on them both :cry:
Time to get the big drill out...

Fiamma F45S endcap - flakey paint 4.jpg

Drilled both heads off, leaving the body of the No.8 Pozi Pan screws in the cassette.
Prayed a little...
Prayed a little bit more...
Supported the inner cassette by hand (a 16yr old son is very helpful at this point!) and removed the end cap.
Told the 16yr to stay there and not move, whilst dad did his thing.
Using mole grips & the strength of Garth (Garth (comic strip) - Wikipedia)
The little devils eventually came out :D
Ran some new screws down the threaded holes with copper slip grease.
All good.

Fitted the new cap, reusing the existing white support thing, that you can just see in the top of this photo:
Fiamma end cap - new 4.jpg

Fitted new screws with plenty of copper slip, so they don't bind/weld together again in the future. :thumbsup:

Looking lots better, good for another 5 years or so.
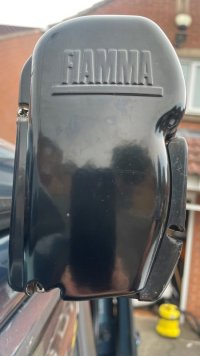
Fiamma end cap - new 3.jpg

Checked the rear cap & all screws came out ok, but just to be on the safe side, coated them with loads of copper slip gunk

Old vrs new part:
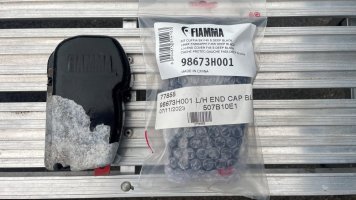
Fiamma end cap - new 5.jpg

Best advice is that if you have a Fiamma awning recently fitted, get those screws out, copper slip them, before they stick in & you have to drill them out.

@AJCConversions - Brandon - I've saved you from this little nasty job from the Xmas to do list!!
 
Last edited:
Good advice Moomin. Mine is going back next month for an awning and that's exactly what I'll do.
Funny noticed mine has started to go... Must de-screw and get some copper grease stuff on pronto! Some Forum....

Excuse my ignorance here pls. Is copper grease the same as copaslip etc...
 
After replying to a fellow forum members question today, I thought I would install the same, as I bought a new end cap, kept safe in my "spares box", since 2023!
Item 21:


I bought the end cap, as mine was suffering from paint peel, which apparently affects most F45S' (@Ed Webb - you replaced yours yet?):

View attachment 260190

I tried to remove the 3 screws (2 visible & 1 hidden under the windy out bit).
Both outer screws wouldn't budge and I ended up rounding off the heads on them both :cry:
Time to get the big drill out...

View attachment 260192

Drilled both heads off, leaving the body of the No.8 Pozi Pan screws in the cassette.
Prayed a little...
Supported the inner cassette by hand (a 16yr old son is very helpful at this point!) and removed the end cap.
Told the 16yr to stay there and not move, whilst dad did his thing.
Using mole grips & the strength of Garth (Garth (comic strip) - Wikipedia)
The little devils eventually came out :D
Ran some new screws down the threaded holes with copper slip grease.
All good.

Fitted the new cap, reusing the existing white support thing, that you can just see in the top of this photo:
View attachment 260193

Fitted new screws with plenty of copper slip, so they don't bind/weld together again in the future. :thumbsup:

Looking lots better, good for another 5 years or so.

View attachment 260194

Checked the rear cap & all screws came out ok, but just to be on the safe side, coated them with loads of copper slip gunk

Old vrs new part:

View attachment 260195

Best advice is that if you have a Fiamma awning recently fitted, get those screws out, copper slip them, before they stick in & you have to drill them out.

@AJCConversions - Brandon - I've saved you from this little nasty job from the Xmas to do list!!
Gave up trying to get the screws out and painted the end caps with a coat or two of Hammerite. Not quite so pretty up close but does job.
 
Took it to a local garage yesterday for a service, did the oil and filter, air filter, diesel filter and renewed brake fluid. While there they told me the fan belt was disintegrating, needed a new belt and tensioner, so that's been fixed this morning. I asked them to check out the occasional coolant leak it has and they advised that it's coming from the EGR cooler area? So it's booked in again to get that replaced early next month.

As there was no service record with the van when I bought it, I asked them to do me a print of the VW online record. All that is on it is the PDI when new and the service just completed. So no idea how well/badly it's been looked after in between.
 
  • Wow
Reactions: CAB
After replying to a fellow forum members question today, I thought I would install the same, as I bought a new end cap, kept safe in my "spares box", since 2023!
Item 21:


I bought the end cap, as mine was suffering from paint peel, which apparently affects most F45S' (@Ed Webb - you replaced yours yet?):

View attachment 260190

I tried to remove the 3 screws (2 visible & 1 hidden under the windy out bit).
Both outer screws wouldn't budge and I ended up rounding off the heads on them both :cry:
Time to get the big drill out...

View attachment 260192

Drilled both heads off, leaving the body of the No.8 Pozi Pan screws in the cassette.
Prayed a little...
Prayed a little bit more...
Supported the inner cassette by hand (a 16yr old son is very helpful at this point!) and removed the end cap.
Told the 16yr to stay there and not move, whilst dad did his thing.
Using mole grips & the strength of Garth (Garth (comic strip) - Wikipedia)
The little devils eventually came out :D
Ran some new screws down the threaded holes with copper slip grease.
All good.

Fitted the new cap, reusing the existing white support thing, that you can just see in the top of this photo:
View attachment 260193

Fitted new screws with plenty of copper slip, so they don't bind/weld together again in the future. :thumbsup:

Looking lots better, good for another 5 years or so.

View attachment 260194

Checked the rear cap & all screws came out ok, but just to be on the safe side, coated them with loads of copper slip gunk

Old vrs new part:

View attachment 260195

Best advice is that if you have a Fiamma awning recently fitted, get those screws out, copper slip them, before they stick in & you have to drill them out.

@AJCConversions - Brandon - I've saved you from this little nasty job from the Xmas to do list!!
Thanks for the advice. Mine's not quite 12 months old, so I did as you suggested. Bottom screws definitely the hardest to remove , but all good now. Cheers.
 
Broke in….
Hadn’t noticed the ladies side door open sensor not working…. Unlocked, put key on seat and then a beep told me the van had locked itself!

A trip to Screwfix for a “Winbag” and then some careful levering and pumping in the the top corner of the door allowed me to get a cable rod in and, holding the key to the seat with a welding rod, I was able to press the unlock button on the key!

Now to source a 3rd key as the spare (surf key) was in the glove box!

A good few squirts with contact cleaner and judicious wiggling of the door catch got the sensor working again! But I’ll keep checking it now!
Update: Door switch has stopped working again!
 
Fitted new Wind Deflectors.. changed the Heko’s - not my install but they had worked a little loose & only 2 clips inserted.
aesthetically better & actually sound better too..
changed the rear Halogens for LED’s last week.. oh yes.. look awesome..
next week there’ll be something else.. looking forward to that :cool:
 
Update: Door switch has stopped working again!
Update 2!
Removed the door lock mechanism (PITA)
Removed the tiny micro switch from said mechanism and modified it to fit one that I (amazingly fortunately) had in my lucky switch ice cream tub!
Put it all back together and tested it then removed the door card again to connect the inside door handle!
Put it all back together and it works now.
Then swapped the two front wheel speed sensors and Carista’d away the fault log!‍‍
Rewarded myself with a Caiprinha!‍

IMG_6870.jpeg
New one in situ - duff one still on the wires.
 
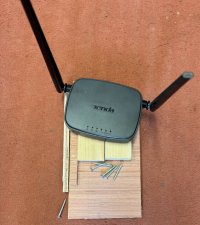
I bought a WiFi router as recommended on here and wanted to fit it under the passenger seat, where switching on the converter will allow the router to be powered via the USB, whilst allowing the laptop to be connected to the mains socket at the rear of the passengers seat.

I also wanted to be able to easily remove the router should I need to work remotely from the van.

The router fits tightly in the shelf and can be accessed by pushing the seat all the way back. I can remove the router in less than 10 seconds. It’s hard to see the router in the last picture as it’s tucked away so nicely.

IMG_2256.jpeg

IMG_2257.jpeg

IMG_2258.jpeg
 
Back
Top