Fridges & Cold Beer -- How I Done It --

I was going to suggest an Anderson. The SB50 is a popular one and you should be able to find a fused loom one made up. It's also flexible as you could use it to connect a maintenance charger or solar charger while camping. If space is at a premium the smaller PowerPole series are also commonly used.

If you go that route you are likely to fuse the Anderson lead quite high, so consider you may need a smaller fuse to protect the fridge lead. There should be one in the 12v plug so if you remove that to change the connector you might want to think about how best to fuse it.
Thanks, that's a good suggestion to fuse the Anderson connection higher so I can use if for additional items. If I go do this route do you think 20 amp would be sufficent? In the wiring diagram I downloaded it details that the (20A-Cigarette Lighter U1, 12V Socket U5) are 20A.

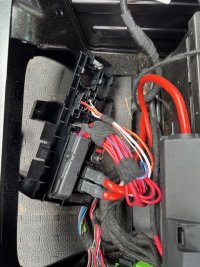
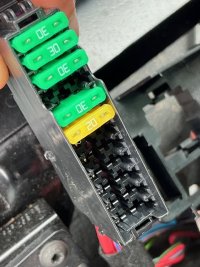
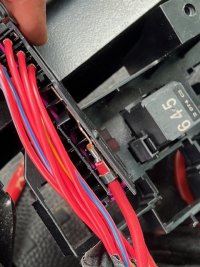
I've taken the passenger seat out today and I'm now able to get a proper look at the wiring. I know it might be neater to try and wire the feed from the reverse of the fuse box but I'm thinking it may be a lot easier to go from the top with a piggy back fuse? Can you also recommend what thickness of wire, would 2.5mm/12AWG be sufficient?

image8.jpegimage3.jpegimage4.jpegimage2.jpeg

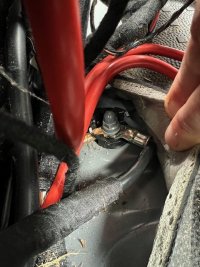
Also, I noticed that all the existing negative connections to the chassis have plastic insulated boots, is this something I need to get for the negative of my Anderson tail?
 
Thanks, that's a good suggestion to fuse the Anderson connection higher so I can use if for additional items. If I go do this route do you think 20 amp would be sufficent? In the wiring diagram I downloaded it details that the (20A-Cigarette Lighter U1, 12V Socket U5) are 20A.

I've taken the passenger seat out today and I'm now able to get a proper look at the wiring. I know it might be neater to try and wire the feed from the reverse of the fuse box but I'm thinking it may be a lot easier to go from the top with a piggy back fuse? Can you also recommend what thickness of wire, would 2.5mm/12AWG be sufficient?

View attachment 241826View attachment 241830View attachment 241831View attachment 241832

Also, I noticed that all the existing negative connections to the chassis have plastic insulated boots, is this something I need to get for the negative of my Anderson tail?

if you want to take your power from that OEM fuse block . . . . .

you can add an extra fuse to that fuse block and have that power your Anderson connector, ( just add the additional fuse crimp pin)

and just add a ring terminal and add the NEG to the chassis point.
 
if you want to take your power from that OEM fuse block . . . . .

you can add an extra fuse to that fuse block and have that power your Anderson connector, ( just add the additional fuse crimp pin)

and just add a ring terminal and add the NEG to the chassis point.
Thanks, do you know where I can source the crimp pin? I’m not really sure what it looks like or how it works?
 
I used the new fuse crimp pins when I added the rear camera...


...


.
 
I used the new fuse crimp pins when I added the rear camera...


...


.
Thanks, I had previously read the thread above but the link for purchasing the pins doesn’t seem to work?
 
Thanks, I had previously read the thread above but the link for purchasing the pins doesn’t seem to work?
gotcha . .

@Pauly @Dav-Tec or anyone else know the part number or a link for the fuse pins?

to add new fuses to the fuse boxes for the larger ATC blade fuse?
 
For 4.8mm blade fuses, try 000979135E for 1mm wire, 000979227E for 2.5mm wire or 000979306E for 4mm wire.

For example these for the typical 2.5mm variant:

Terminals:

Repair wire:

In general Macroconn terminals are good and they provide most variants, including sealed and gold plated ones.

This post from another forum is perhaps the best collection of terminals used in VW vehicles I’ve seen.
 
gotcha . .

@Pauly @Dav-Tec or anyone else know the part number or a link for the fuse pins?

to add new fuses to the fuse boxes for the larger ATC blade fuse?
Thanks for your help Dellmassive, much appreciated. If I make up a Anderson SB50 tail using the 000979227E and 2.5mm cable, what AMP fuse would size 4.8mm blade fuse would be appropriate? The wiring diagram I downloaded indicates the 12V sockets in the van are fused at the Leisure Battery at 20AMP? Is this the main fuse for the sockets or would they be fused lower separately?

Also, there is no separate fuse in the end of the fridge cigarette connector so do I assume it's capable of coping with whatever the cigarette 12V is rated at? I guess I could just use an 8amp blade fuse and change it If I ever need to draw any more?
 
Also, there is no separate fuse in the end of the fridge cigarette connector so do I assume it's capable of coping with whatever the cigarette 12V is rated at? I guess I could just use an 8amp blade fuse and change it If I ever need to draw any more?
I believe the Alpicool type fridges have a blue 15 Amp blade fuse internally - compressor fridges have quite a surge at the start so don't use to the average consumption.

If there is no fuse in the 12v plug and no cable gauge markings to use as a guide I'd probably fuse the fridge lead at around 10 Amps.

For now if that's all your using the SB50 for I'd fuse that at 15 Amps.
 
I believe the Alpicool type fridges have a blue 15 Amp blade fuse internally

Can confirm they have *some* fuse. Not the best of pics but here’s the guts of my Alpicool taken back at when I changed the fan to a less noisy one.

IMG_1541.jpeg

compressor fridges have quite a surge at the start

Alpicools also have a slow start which reduces the surge. But it’s still there, just not as steep as if the compressor went on full blast immediately.
 
I believe the Alpicool type fridges have a blue 15 Amp blade fuse internally - compressor fridges have quite a surge at the start so don't use to the average consumption.

If there is no fuse in the 12v plug and no cable gauge markings to use as a guide I'd probably fuse the fridge lead at around 10 Amps.

For now if that's all your using the SB50 for I'd fuse that at 15 Amps.
Thanks roadtripper, that's very helpfull.

Sorry, I have another few questions, for the SB50 tails I was thinking of using 4mm cable to allow for max current for the fridge but I can't get hold of the 4mm fuse pins without waiting for a few weeks. I can get hold of the 2.5mm fuse pins on Amazon, do you think 2.5mm (10AWG) will be thick enough or should I try to go a thicker gauge?

Also, can you reccomend a type of inline fuse I can add to the tail that I will make from the existing fridge 12V lead? I did see these on Amazon and I'm hoping I can remove the wires they are supplied with so I can add them to the fridge 12v power lead.
61TJ42d0oiL._SL1000_.jpg51HoYXxHmeL._SL1000_.jpg
 
At this point I think you're in danger of over thinking things for the primary purpose of getting your fridge running.

I wouldn't buy any electrical items from eBay or Amazon unless it was from a vendor I knew - there are simply far too many low quality and down right fake items washing around for something you are installing under a seat.

For now keep it simple:
  • Split the fridge lead you have and put an SB50 on each, this allows you to use the fridge elsewhere
  • Buy a premade fused SB50 loom and attach to a fused lug on your battery fuse box and the ground bolt and down rate any fuse in it to 15 amps
or
  • Get a 2.5mm2 repair wire and make up your own SB50 loom and again fuse it to 15 amps

Yes ideally the fridge cable would have an inline fuse, and commonly it would be a glass fuse under the "tip" of the 12v plug, but if the fridge has an internal blade fuse instead it's safe enough given it's a highly specific cable.
 

A very Nice fridge, with battery and solar input.

++​

Anker EverFrost 50L Dual-Zone Electric Powered Cooler​

Features
- Dual-Zone (Cooling and Freezing)
- Temperature Range From -20 to +20°C
- EasyTow™ Suitcase Design
- Efficient Cooling Compressor
- Smart Control Via App

Includes: Anker EverFrost Powered 50L Cooler, Car Charger, 95W Power Adapter, Removable 299Wh Battery, User Manual x 1


On your way to your vacation destination or for a day trip? Anker EverFrost Dual-Zone Powered Cooler 50 is your ideal companion for the road - a portable high-capacity cooler that reliably keeps your food and drinks cold during outdoor adventures. With a generous volume of 53 litres, it provides ample space to keep all your treats icy cold while traveling or at your destination. The removable 299Wh battery allows for up to 27 hours of continuous operation.

The built-in USB ports offer you the ability to charge your phone, laptop, tablet, or other devices on the go. With the convenient Anker app, you have easy access to all the functions and can control your Everfrost Cooler remotely. The spacious interior can accommodate 62x 330ml bottles or cans - perfect for your favourite beverages or a combination of food and drinks. Thanks to the two-zone cooling, you can set different temperatures for both compartments to not only cool but also freeze.

The Anker Everfrost Powered Cooler 50 also features the EasyTow™ handle from EverFrost, making it incredibly easy to carry and move the cooler, while also serving as a fold-out table. The lid of the Powered Cooler 50 is equipped with a sealing gasket and a magnetic closure, ensuring your cooler is always securely sealed.

Up to 42H of Long-Lasting Cooling
Anker EverFrost, 53L capacities, can keep a temperature of 39°F (4°C) for up to 27 hours. This was tested with an ambient temperature of 77°F (25°C) and when the battery was fully charged.

100W Max Solar Input
Join the green revolution with Anker EverFrost. Its 100W solar input allows for convenient, lightweight, and eco-friendly outdoor charging.

0% Ice, 100% Storage
With Anker EverFrost, enjoy twice the storage capacity of traditional coolers without the need for ice. Say goodbye to wasted space and hello to practical storage—ideal for weeklong trips.

Replaceable 299Wh Battery
The removable 299Wh battery of the cooler also serves as a power bank. With a 60W PD USB-C port and two 12W USB-A ports, you can easily charge your smartphone and music box on the go.

Efficient Cooling System
Equipped with a high-efficiency cooling compressor, it only takes 30 minutes for food and drinks to cool down from a hot 77°F (25°C) to a cool 32°F (0°C).

Dual-Zone Cooling
Keep meat frozen for the grill without turning drinks in a block of ice. Anker EverFrost 53L features dual spaces for cooling and freezing.

Travel-Friendly Design
Go across any terrain, even if you're not a bodybuilder with the EasyTow™ handle and 6-inch durable wheels. EverFrost even comes with an extendable table and built-in bottle opener for more home convenience wherever you are.

Features:
  • Powerful 299Wh Battery-Powered Cooler
  • Temperature range from -20 to +20°C
  • EasyTow™ suitcase design
  • Efficient cooling compressor
  • Smart control via app
  • Dimensions: H 48.7 x W 96.2 x D 43 cm
  • Weight: 27.5 kg
Specifications


1718523987493.png1718524077305.png1718524068386.png1718524060641.png1718524052015.png


+++


+++
 
Anyone own the Alpicool 50 fridge?, Just wondering if you ever remove the top freezer section to make more room for fridge items, iv tried this as we don’t really need to freeze stuff, but it seems to send the fridge temperatures haywireC5690862-56D6-4CEC-8469-9738DCCEAFDA.jpeg
 
Anyone own the Alpicool 50 fridge?, Just wondering if you ever remove the top freezer section to make more room for fridge items, iv tried this as we don’t really need to freeze stuff, but it seems to send the fridge temperatures haywireView attachment 247219
Yes, but I've not removed the freezer divider.

However, although there's 2 temperature readouts, I think there's only one controller for the entire fridge, which means to get the freezer section down to -12 or whatever the minimum temperature you can set is, it needs to cool down the entire fridge, which may be why you see the main fridge area temperature going mad.
Yes -12 is the lowest for the freezer, iv turned up the fridge temp to compensate but this seems to still make the fridge too cold, shame as it’s one of their selling points, being able to easily remove the freezer shelf to make more space, anyway I suppose I’ll just have to keep a box of magnums in there and live with it, apart from that I really like the duel opening door
 
It's a single compressor fridge with an insulated box around the condenser evaporator to use like a traditional "ice box" fridge?

How many temperature controls does it have 1 or 2?
 
Last edited:
It's a single compressor fridge with an insulated box around the condenser to use like a traditional "ice box" fridge?

How many temperature controls does it have 1 or 2?
If it's exactly the same model as mine, it has 2 - one for the fridge area and one for the freezer area.

Once it's down to temp it seems to be pretty good at keeping them both at the required temperature.

1000009116.png
 
My point is if you remove the divider you are running it as a fridge OR a freezer - so you need to set both controls to a suitable temperature in this case.

With a single compressor the 2 areas are not independent - it will be just designed so the evaporator coils are in the top "freezer" area so that if the "ice box" is fitted it can run as dual zone.

The temperature controls will just run the same compressor and put the coolant through the same coils mostly at the top of the fridge - without the divider the actual temperatures will never be that far apart no matter what you do - you can't have dense air "freezer" at -12 in the top not sink to the bottom of the cabinet where you are trying to have +5 "fridge" air.
 
My point is if you remove the divider you are running it as a fridge OR a freezer - so you need to set both controls to a suitable temperature in this case.
Unfortunately the manufacturer seems to have not included this as the highest temperature you can set the 'freezer' to, regardless of whether the divider is in place or not, is -12 c. Which, as you say, isn't going to work well, when you actually want the whole compartment to be at 2 degrees.

Hence, it's just easier to keep the divider in place and stick some ice pops, or ice cream in there!
 
Back
Top