You are using an out of date browser. It may not display this or other websites correctly.
You should upgrade or use an alternative browser.
You should upgrade or use an alternative browser.
[Guide] Mobile Solar Panels ? . . . - How I Did It -
- Thread starter Dellmassive
- Start date
I'm sure @Dellmassive will be along shortly to confirm but I think that whilst your cetek appears to working, with out the the thin red wire connected it will think you van has an ordinary alternator and not a stop start/smart alternator and therefore wont be charging properly when the van is running. Sorry but can you try and take one more photo of the other end of the cetek were the thin red and black wire goes in
yep, looks to me like you have power coming from your starter battery to the cetek (thick red wire), power from the cetek to the leisure battery (thick red wire), the cetek earthed to leisure battery (thick black wire) via a buzz bar. The temp gauge wire (thinner black wire) should have a probe on the other end taped to the leisure battery so it can monitor how hot your lb gets, which only leaves the very skinny black and red wire. The black needs to be earthed only if you have an agm battery (you dont) and the red wire should run to your vans original fuse box to pick up a live that comes on with the ignition. I suggest you wait to see if dell confirms this as hes our expert.
OK, thanks for all your help so far much appreciated
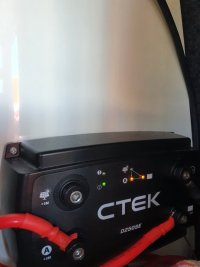
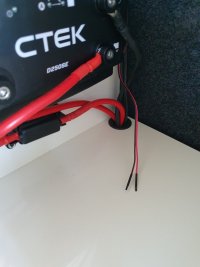
Looking at the pics...Hi @Dellmassive thanks for helping me with this, I have attached pics for you to look over, am presuming we, as you suspect, have no charger, so would appreciate your opinion on which one to get
Cheers
View attachment 168521
View attachment 168522
View attachment 168523
View attachment 168524
Your EHU hookup is basic and just power's one or more sockets in the van.... Which is fine.
But as we thought, you have no charger on the LB or starter battery to keep them topped up while your camping.
....
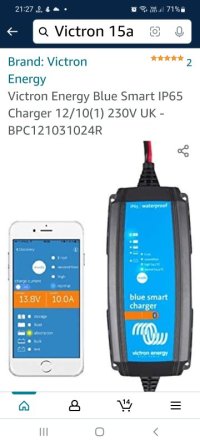
It's an easy fix, just add a charger to the LB and a separate one on the starter if.its needed.
People normally go for 5-15A for the leisure battery.
And 3-5A for the starter.
...
Have a look at the charger thread for some Imfo....

Battery Chargers - How I Did It -
Battery Chargers - How I Did It - So its that time of year again, cold, rainy. . . . . . . flat battery =[ This time we look at Battery Chargers. Our vans will most likely come with a AGM style starter battery, for this type of battery we need a "Smart Charger" . . . . but what does this...
.
Thanks so so much @Dellmassive, I'll order this today I've got the Renogy 200w solar suitcase arriving today also so have I now covered all bases???
My only niggle now is this loose red wire what are your thoughts on this?
My only niggle now is this loose red wire what are your thoughts on this?
I’d get one of these for your leisure battery, Bluetooth monitor for the state of your battery, just connect across the terminals
@Dellmassive Dell any thoughts on my assessment of the cetek not being connected properly?

@Dellmassive Dell any thoughts on my assessment of the cetek not being connected properly?

This thread confirms you need to connect the thin red wire to an ignition live

 www.t6forum.com

CTE D250SE ignition cables
Hi all, I am currently trying to fit the CTEK D250SE to my T6 and I’m hoping for some clarity on the ignition cables. I have a dual purpose flooded lead-acid leisure battery and am wondering do I fit the black ignition cable to ground and the red to the fuse board or is that only for AGM...
OK thanks @jimc91
I'm looking at an extension cable for the solar panel , Renogy 200w suitcase, there's 2 options, 10 AWG or 12 AWG, which do I need?
Thanks
I'm sure Dell will be along soon with figures and ratings but as I understand it, the larger the AWG rating the smaller the conductors cross section (1).
In short, the smaller the conductor the more resistance the conductor opposes to current flow (in amps). The more resistance in the conductor, the more voltage dropped along that conductor's length. In short, the more expensive AWG10 cable will give a smaller voltage drop along its length and thus charge the battery faster, than supplying current through the AWG12 cable.
If we think about it, adding a longer wire between the solar panel and the battery will add resistance to the connection between the solar panel and the battery. That resistance results in a voltage drop along the length of the wire, between the solar panel and the battery. This decreases the voltage seen across the battery terminals, as a small proportion of the charging voltage from the panel is lost along the length of the charging cable. If you have 10m of 12AWG cable, then you have ~0.052ohms (1) of resistance between the panel and the battery. If the panel supplys around 10amps (2) flowing to charge the battery, then you might loose 0.52volts at the battery terminals, so a 14.4v output from the panel would see only 13.88v at the battery. But if you add in 10AWG cable then a voltage drop of only 0.33v would result, giving 14.07V at the battery terminals.
The lower charging voltage, the more time spent charging, to reach full charge of the battery. In the end it may come down to cost, and your budget.
(1) AWG - American Wire Gauge Current Ratings
(2) 200 Watt 12 Volt Monocrystalline Foldable Solar Suitcase (spec - Optimum Operating Current)
Short question.
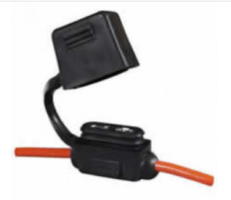
I have splashproof blade fuse holders to add inline with my permanent solar suitcase charging cables, 10AWG 6mm squared, crimped ends. The original croc clip cable supplied has a fuse, inline 15amp . What is the best way to join a fuse inline with the positive (red) cable? Those small blue joining crimps are rated at 17amps but are only 2/5m sq. Or is there something suited to the job?

Thanks, Dave C
I have splashproof blade fuse holders to add inline with my permanent solar suitcase charging cables, 10AWG 6mm squared, crimped ends. The original croc clip cable supplied has a fuse, inline 15amp . What is the best way to join a fuse inline with the positive (red) cable? Those small blue joining crimps are rated at 17amps but are only 2/5m sq. Or is there something suited to the job?

Thanks, Dave C
Last edited:
That's great @Davec thanks so much, I blinkin love this forumI'm sure Dell will be along soon with figures and ratings but as I understand it, the larger the AWG rating the smaller the conductors cross section (1).
In short, the smaller the conductor the more resistance the conductor opposes to current flow (in amps). The more resistance in the conductor, the more voltage dropped along that conductor's length. In short, the more expensive AWG10 cable will give a smaller voltage drop along its length and thus charge the battery faster, than supplying current through the AWG12 cable.
If we think about it, adding a longer wire between the solar panel and the battery will add resistance to the connection between the solar panel and the battery. That resistance results in a voltage drop along the length of the wire, between the solar panel and the battery. This decreases the voltage seen across the battery terminals, as a small proportion of the charging voltage from the panel is lost along the length of the charging cable. If you have 10m of 12AWG cable, then you have ~0.052ohms (1) of resistance between the panel and the battery. If the panel supplys around 10amps (2) flowing to charge the battery, then you might loose 0.52volts at the battery terminals, so a 14.4v output from the panel would see only 13.88v at the battery. But if you add in 10AWG cable then a voltage drop of only 0.33v would result, giving 14.07V at the battery terminals.
The lower charging voltage, the more time spent charging, to reach full charge of the battery. In the end it may come down to cost, and your budget.
(1) AWG - American Wire Gauge Current Ratings
(2) 200 Watt 12 Volt Monocrystalline Foldable Solar Suitcase (spec - Optimum Operating Current)
check this out . . .
ANKER Innovation with the new 100W panel they just released. . .
++++
what a great idea . . . and the first time I've seen it.
the idea is simple just like a sundial, it produces a shadow from the blue spot. . .
the idea is to keep the spot in the circle. . . . simples.
so takes all the guess work out of angling up your panels for optimum power yield. . .
.++++


+++

+++
I think that awesome. . . . .
well now look at this . . .
ECOFLOW has just released a mobile version that can work on most panels. . . .

+++

 uk.ecoflow.com
+++
Catch Every Ray of Light
Keep sunlight at a 90° angle and concentrate the sun’s rays onto the surface of your solar panel. The Solar Angle Guide gives you a way to maximize solar exposure.
Seriously Simple to Use
Clip to the edge of your solar panel. Next, align your solar panel to the sun’s rays using the shadow. Once aligned, you’re good to go.
Built to Last
The Solar Angle Guide will be on the front line when it comes to the sun’s rays. Its UV resistant properties mean you’ll be able to increase solar intake and shorten solar charging times for years to come.
Get Your Angles Right
Thanks to its transparent shell, you can line up the sun’s shadow to the center of the Solar Angle Guide. This ensures you’re perpendicular to the sun’s strongest rays.
How to Use Solar Angle Guide ?
1. Clip the guide to the edge of your solar panel.
2. Angle your solar panel so the sun is shining through the transparent shell of the guide.
3. Once the sun is shining through a transparent shell, adjust the angle of your solar panel until the shadow hits the middle of the guide.
4.Aim to get as close to the middle as possible. The closer the angle of sunlight to 90°, the higher solar intake and a shorter solar charging time you’ll get.
Specifications
Dimensions: 1.97*2.12*1.18 in /50*54*30mm
Weight: 0.06lb / 25g
+++
I've just ordered two allong with the new DELTA 2
+++

 www.t6forum.com
+++

+++
ANKER Innovation with the new 100W panel they just released. . .
++++
- Smart Sunlight Alignment: Equipped with Anker's proprietary Suncast technology, adjust the solar panel properly to capture direct sunlight for maximum charge.
what a great idea . . . and the first time I've seen it.
the idea is simple just like a sundial, it produces a shadow from the blue spot. . .
the idea is to keep the spot in the circle. . . . simples.
so takes all the guess work out of angling up your panels for optimum power yield. . .
.++++


+++

Anker 625 Solar Panel (100W)
High Conversion Efficiency: The solar panel converts up to 23% of sunlight into solar energy, charging your solar generators even on cloudy days. Smart Sunlight Alignment: Equipped with Anker's proprietary Suncast technology, adjust the solar panel properly to capture direct sunlight for maximum...
www.anker.com
+++
I think that awesome. . . . .
well now look at this . . .
ECOFLOW has just released a mobile version that can work on most panels. . . .

+++

EcoFlow Solar Angle Guide - EcoFlow UK
+++
Catch Every Ray of Light
Keep sunlight at a 90° angle and concentrate the sun’s rays onto the surface of your solar panel. The Solar Angle Guide gives you a way to maximize solar exposure.
Seriously Simple to Use
Clip to the edge of your solar panel. Next, align your solar panel to the sun’s rays using the shadow. Once aligned, you’re good to go.
Built to Last
The Solar Angle Guide will be on the front line when it comes to the sun’s rays. Its UV resistant properties mean you’ll be able to increase solar intake and shorten solar charging times for years to come.
Get Your Angles Right
Thanks to its transparent shell, you can line up the sun’s shadow to the center of the Solar Angle Guide. This ensures you’re perpendicular to the sun’s strongest rays.
How to Use Solar Angle Guide ?
1. Clip the guide to the edge of your solar panel.
2. Angle your solar panel so the sun is shining through the transparent shell of the guide.
3. Once the sun is shining through a transparent shell, adjust the angle of your solar panel until the shadow hits the middle of the guide.
4.Aim to get as close to the middle as possible. The closer the angle of sunlight to 90°, the higher solar intake and a shorter solar charging time you’ll get.
Specifications
Dimensions: 1.97*2.12*1.18 in /50*54*30mm
Weight: 0.06lb / 25g
+++
I've just ordered two allong with the new DELTA 2
+++

SOLAR GENERATORS - LifePo4 Battery Boxes -- How I done It --
ECOFLOW DELTA 2 ITS coming. And now with Lifepo4 cells.
+++

+++
Similar threads
- Replies
- 8
- Views
- 742
- Replies
- 61
- Views
- 4K
- Replies
- 5
- Views
- 491


