Good, that correct. Ignore me. Was just going by your drawing.
You are using an out of date browser. It may not display this or other websites correctly.
You should upgrade or use an alternative browser.
You should upgrade or use an alternative browser.
Orion 12/12/18 keeps switching off
- Thread starter Chris1983
- Start date
-
- Tags
- dc - dc charger victron
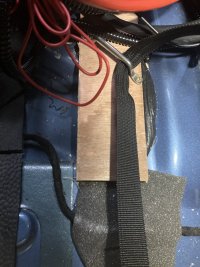
Actual as designed grounding point is under that bonded wood piece I think
Finally found a picture of factory ground point - surprisingly hard to find! (credit @Jet Grommet / Bung underneath front Seat)
It's a white dome nut in the center line of the seat. As you see from the picture it's much closer to the front seat bolts than the rear ones. Little bit hard to tell from your picture where that is exactly but looks to me like perhaps the ground point is not under the bonded wood?

My bad. Yes to confirm shunt to LB -ve post and shunt to -ve busbar, which then with all other negatives connects to the seat post (which may be a priblemGood, that correct. Ignore me. Was just going by your drawing.
I’ll look nowFinally found a picture of factory ground point - surprisingly hard to find! (credit @Jet Grommet / Bung underneath front Seat)
It's a white dome nut in the center line of the seat. As you see from the picture it's much closer to the front seat bolts than the rear ones. Little bit hard to tell from your picture where that is exactly but looks to me like perhaps the ground point is not under the bonded wood?
View attachment 269013
Here is a distant shot of where the ground point is under the passenger seat (circled in red). It’s the same place under the drivers but mine was removed as that’s where my heater pipes are.

As a minimum I’d suggest removing the negative from the seat bolt then sanding the paint off that area before refitting to get a metal to metal contact. See if that improves anything. Longer term take the base out and sand the bolt and underside of the base so there is no paint on the base or coating on the bolt.
The crimps on the negatives either side of the shunt look rather flexible. Are the crimps good?
Be careful doing bolts/nuts up too tight or you will damage something. If it’s not working with just a nip then there is an issue.
I neglected the poor kids more to do this hahhaI’ve given myself a few extra inches on that thick black cable to reduce the mechanical stress at those joints. Do I need to equate to longer red leads too?! Or will that be okay?
Not sure. Looks like 16mm2 which would be good. Probably printed on it somewhere. Or the ring terminal will have it stamped on in the format of x-y where x is the cable cross-section and y is the bolt size (e.g. 16-8).Can you remind me what size wire is the thick stuff?
Yes 16mm2. Will a few inches longer on the black make any difference? I’ve made a new cable up to reduce the mechanical stress you pointed out. Wondering if I need to remake red cablesNot sure. Looks like 16mm2 which would be good. Probably printed on it somewhere. Or the ring terminal will have it stamped on in the format of x-y where x is the cable cross-section and y is the bolt size (e.g. 16-8).
Absolutely no need to match lengths. The negative uses the vehicle chassis so is essentially a random length but huge cross section. Matching lengths is for connecting 2 batteries in parallel.I’ve given myself a few extra inches on that thick black cable to reduce the mechanical stress at those joints. Do I need to equate to longer red leads too?! Or will that be okay?
Yeah, looks like maybe you and a few others nailed it! Will try and sand back boot and seat base where connects to ‘better’ connection tomorrow. Can’t access original grounding point and not sure I have it in me just yet to remove seat base and treat bolt as @EAN had prior. What’s the downside of not having the perfect grounding point? Kaboom?I posted poor earth in post 17.
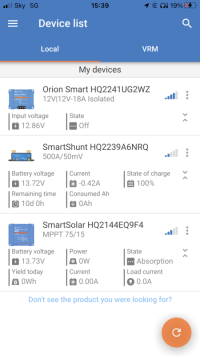
Need to run down LB a bit too and when get some sun drive and see what happens with LB and Solar relationship. Cos that is deffo a thing I’ve noticed (MPPT switching to 0 watts when DC to DC kicks in.
Similar threads
- Replies
- 17
- Views
- 416
- Replies
- 7
- Views
- 1K
- Replies
- 8
- Views
- 1K
- Replies
- 8
- Views
- 707


