Same, with LiFePO4 that means it's topping up the SB regardless of solar charging - with a 230Ah LB I'm happy for it to take a few Ah from the LB.I left mine on default out of the box setting 4, no hassle.
You are using an out of date browser. It may not display this or other websites correctly.
You should upgrade or use an alternative browser.
You should upgrade or use an alternative browser.
Yeah, the K.I.S.S. mantra works for me (thankfully, as I am both S and SMine works perfectly fine, it's just a 12v device that pull a couple of amps every so often - so I'm not sure how it needs to 'play nicely' with Victron kit
The option they've given may be a more complex, better option but it's just keeping the SB charge topped up, it doesn't need to be complex!
No issues. It sits there and does its business. Totally fit and forget.They said they suggested the Balmar because "it plays nicely" with all the other Victron kit. I'm guessing you guys don't have any interoperability issues using the Ablemail with any Victron kit you have, do you?
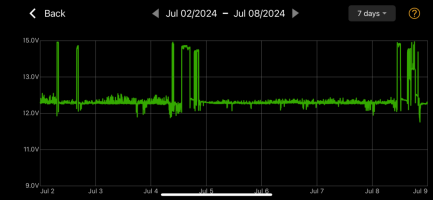
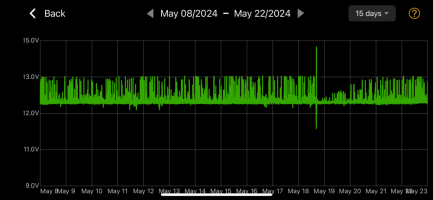
My starter battery is on its last legs and the Ablemail is keeping it going very nicely. Here’s a couple of BM2 traces showing the Ablemaim keeping the battery above 12.3v.


Good to know. I put mine onto setting 3 for the lifepo4. Works great.I left mine on default out of the box setting 4, no hassle.
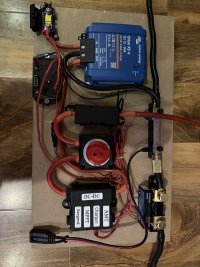
I’m fitting one into my system at the moment. It’s the black box below the orion xs. I’ve taken the feeds to the bus bar and fuse holder because the Orion’s cable holder didn’t like the extra wires in it or I would have taken them straight into the Orion.I’ve just bought the Victron shunt to fit to my LB and maybe link to SB, and I have a tab open for the Ablemail. Where are folks fitting the Ablemail, is it next to the SB? Pictures would be nice if you’d like to show off.
It was simple to wire with especially with the guidance from the guys on here

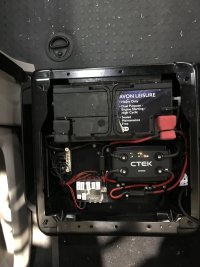
Ah, thanks. So if I’m lifting out my drivers seat to get to the leisure electrics and fit the victron shunt I can do the ablemail at the same time? I have a CTEK D250SE doing the clever stuff (is that what the ablemail is connecting to?)Next to the LB. It’s tiny, about the size of a deck of cards. I did 3 cables, as per the instructions, one into each terminal of the DC-DC (sounds like the Victron XS doesn’t like having 2 cables because of the cover but it’s fine on the older ones).

The SB positive on the Ablemail to the input terminal on the ctek, the LB positive on the Ablemail into one of those free slots on your fusebox, and the negative to your busbar.Ah, thanks. So if I’m lifting out my drivers seat to get to the leisure electrics and fit the victron shunt I can do the ablemail at the same time? I have a CTEK D250SE doing the clever stuff (is that what the ablemail is connecting to?)
View attachment 256115
Easy!
The shunt just goes in between your battery negative and the busbar.
Yes and yes. Detail as given by TallPaul aboveAh, thanks. So if I’m lifting out my drivers seat to get to the leisure electrics and fit the victron shunt I can do the ablemail at the same time? I have a CTEK D250SE doing the clever stuff (is that what the ablemail is connecting to?)
View attachment 256115

Thanks. Does the able Mail come with the various leads to connect everything up or do I need to source those separately? I’m just about to buy one from simply split charge.The SB positive on the Ablemail to the input terminal on the ctek, the LB positive on the Ablemail into one of those free slots on your fusebox, and the negative to your busbar.
Easy!
The shunt just goes in between your battery negative and the busbar.
It'll come with spade connectors for the Ablemail side but you'll need the other end connectors, and wire. Good 2mm² cable is fine.Thanks. Does the able Mail come with the various leads to connect everything up or do I need to source those separately? I’m just about to buy one from simply split charge.
Hi, nice install. Looking at the fuse in the top right corner, it looks like the lid/cover wont close does that not bother you?I’m fitting one into my system at the moment. It’s the black box below the orion xs. I’ve taken the feeds to the bus bar and fuse holder because the Orion’s cable holder didn’t like the extra wires in it or I would have taken them straight into the Orion.
It was simple to wire with especially with the guidance from the guys on here
View attachment 256114
Cheers
Edit just noticed that the wire going off to the right looks like it has transparent red insulation, what is it?
Do you have any links please as this is geniuscame up with a quick way to attach some legs to the Ovano table so I can use away from the van when cooking the Bacon, also a side table for when lounging in the camping chairs, 2 legs and two clamps off ebayView attachment 256056View attachment 256057
Something like this do the trick for Single-Core PVC Auto Cable 17.5amp 2mm? How much will I need? If I were to add the SB would I just need more of the same cable to route through to the SB? What connector types do I need? Thank you allIt'll come with spade connectors for the Ablemail side but you'll need the other end connectors, and wire. Good 2mm² cable is fine.
Do you mean the fuse at the top left of pic? I’ve simply not closed the lid on it.Hi, nice install. Looking at the fuse in the top right corner, it looks like the lid/cover wont close does that not bother you?
Cheers
Edit just noticed that the wire going off to the right looks like it has transparent red insulation, what is it?
I need to connect the 16mm cable coming from the starter battery to it.
The main red power cable going off to the right is a different high quality copper power wire that has a red transparent coating that allows you to see the twisted copper strands inside.
I already had it from previous mental car audio instal. That’s why it’s different to the rest.
I’m simply following all the amazing chaps advice on here on what I needed to buy and how to install it to upgrade to a banging lithium big solar off grid system.
All the progress on my upgrade is in the thread ‘power upgrade advice’ in the electrics section.
That’s fine. If you put the Ablemail by the DC-DC you won’t need much at all. 1m red,1m black should be fine. You don’t need to run a cable back to the SB, you just intercept the one that come from the SB to the DC-DC near the DC-DC.Something like this do the trick for Single-Core PVC Auto Cable 17.5amp 2mm? How much will I need? If I were to add the SB would I just need more of the same cable to route through to the SB? What connector types do I need? Thank you all
Winning. Thank you.That’s fine. If you put the Ablemail by the DC-DC you won’t need much at all. 1m red,1m black should be fine. You don’t need to run a cable back to the SB, you just intercept the one that come from the SB to the DC-DC near the DC-DC.
As part of a furniture setup I’ve been making, I bought a kiravans pro table leg. I previously tried the marvix which is similar to the lagun and had considered the ovano.
I ended up going for the kiravans version as I liked the idea of having two mounts in the van; one at the b-pillar and one in the back. Then you just move the table leg between them depending on where you want it. The kiravans version has a nice thin mount on the table end of the system as well, so it’s easy to store when not in use (although it can’t twist like the ovano or some others to rest against the passenger seat back).
I found the ovano didn’t have a mount for the back/bed install (although they could fairly easily offer one if they wanted due to their nice design) as they’ve made a piece specifically for the pillar. The lagun and marvix versions had separate mounts, but swivel adjusters got in the way of swinging the table round so the table could be positioned out of the sliding door easily. You could get around this but it was too fiddly for me as you needed to flip parts around every time you wanted the table inside or outside.
Whatever table I went for, I wanted it to be fully supported on a single mount that didn’t require additional legs or fitting to the floor, because I have the rubber floor in the back.
As with many tables like this, you can mount the table off-centre to give you options when rotating it.
So lots of constraints but happy with the outcome!

I’ll post link tonight, I did contact Ovano to ask if they could design some kind of legs as an accessory to allow a secondary use of their table off the van, didn’t get a reply unfortunately.Do you have any links please as this is genius
Hi, thanks for the reply. Yes I did mean the fuse at the top left. Only reason I asked is if your midid fuse holder is the same as mine there is no way I could get that fuse lid to close on it with anything more than the 16mm2 cable you have to it. The other 2 small ones would prevent it, without chopping bits of the lid off.Do you mean the fuse at the top left of pic? I’ve simply not closed the lid on it.
I need to connect the 16mm cable coming from the starter battery to it.
The main red power cable going off to the right is a different high quality copper power wire that has a red transparent coating that allows you to see the twisted copper strands inside.
I already had it from previous mental car audio instal. That’s why it’s different to the rest.
I’m simply following all the amazing chaps advice on here on what I needed to buy and how to install it to upgrade to a banging lithium big solar off grid system.
All the progress on my upgrade is in the thread ‘power upgrade advice’ in the electrics section.
Makes sense about audio cable and the transparency. I've noticed it often tends to be transparent but not sure why, maybe just for pose factor in the audio install.

Similar threads
- Replies
- 123
- Views
- 15K
- Replies
- 21
- Views
- 918
- Replies
- 12
- Views
- 1K

