ToddiesT6 - Build Log

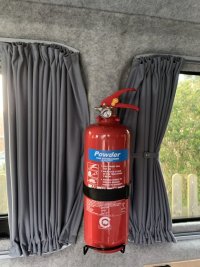
So I’m clearly getting better as I’ve even managed a very small (but hugely important) camper job today. That being to install the fire extinguisher in a convenient place before the first family wildcamp.

The indirect prompt came from a DOC member who almost lost the lot in a kettle fire last weekend….& so is it worth you also thinking about your own evacuation plan & equipment position?

Stay safe folks!
653C53F2-75B3-4171-9B3D-4F5D65AB45ED.jpeg
 
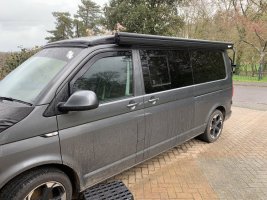
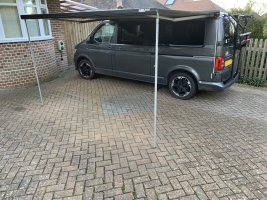
A pre booked day off & despite the rain, I’ve got the awnings installed :)

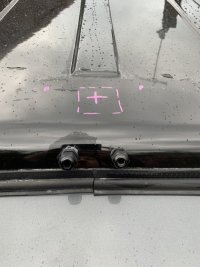
Alas because of the pop top, I’ve had to create a new rearward fixing point with (yep you guessed it) a ‘Rivnut’ & silicon seal. Unfortunately it’s double skinned in the gully, so I couldn’t add the extra washer as planned, but I’m happy enough with the M6 plus sika 252 alone.

Next step was repositioning the ‘through bracket to awning’ bolts (Rivnuts again) & that’s it done.

314DE146-A54D-4A3D-8628-A5F10F715932.jpeg

D104992C-E3A3-4616-B726-4535DDC7D091.jpeg

9DD19FB2-C822-4BA4-A94E-B96370DDB8D6.jpeg

E8685D7B-D1D2-4814-8CDF-53C9354A697D.jpeg

1E5C579A-B9C1-4E88-95B3-6575EB8230EB.jpeg

16ABB824-EEAB-46CB-8DF5-C4955F003884.jpeg
 
How much matting did you order?
Way to much as I couldn’t find a clear answer & hadn’t joined T6F!

But in total 8x boxes of 20x sheets for 100% coverage of a LWB van with full window. I’ve since sold on the spare 2 boxes, so 120x sheets.

You could use less for sure & I likely will if even I build a van for another on commission as I’ve been asked.
 
Last edited:
A little progress with the units today - mostly marking out & figuring where to place what.

The littlest nipper is keen to get involved - and I’m very happy to start them young with the mindset of DIY! Maths, drawing & can-do attitude takes you a long way in life.

CB26848F-310C-46AA-A735-0B6305DAED26.jpeg

8BED8616-0AA5-406F-A6E1-405F01F183E7.jpeg
 
So I’m clearly getting better as I’ve even managed a very small (but hugely important) camper job today. That being to install the fire extinguisher in a convenient place before the first family wildcamp.

The indirect prompt came from a DOC member who almost lost the lot in a kettle fire last weekend….& so is it worth you also thinking about your own evacuation plan & equipment position?

Stay safe folks!

View attachment 195705

I doubt that extinguisher will stay in place in a severe collision, while it provides fire protection it can also wipe somebody out in the front of the van.
 
I doubt that extinguisher will stay in place in a severe collision, while it provides fire protection it can also wipe somebody out in the front of the van.
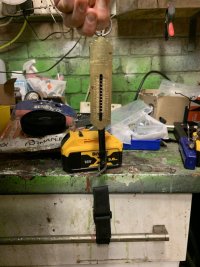
Its a fair point, but exactly why it’s got that extra Velcro strap. The unit is 1.5kg, my rudimentary shear out test topped out at 15kg load & assuming 5G loading i’ve a 2:1 safety factor for accidental detachment.

severity x detection x occurrence = RPN (Risk)

Fire (delay access) = 9 x 9 x 3 = 243

Collision (detachment) = 6 x 6 x 3 = 108

For the time being (having just installed electrics) I would rather have the FE close to hand than worry about a collision - But each to their own.

81141054-7BF2-4434-9DB6-725B2F2E48DA.jpeg
 
Its a fair point, but exactly why it’s got that extra Velcro strap. The unit is 1.5kg, my rudimentary shear out test topped out at 15kg load & assuming 5G loading i’ve a 2:1 safety factor for accidental detachment.

severity x detection x occurrence = RPN (Risk)

Fire (delay access) = 9 x 9 x 3 = 243

Collision (detachment) = 6 x 6 x 3 = 108

For the time being (having just installed electrics) I would rather have the FE close to hand than worry about a collision - But each to their own.

View attachment 196532
I was thinking more about the screws in shear load. Not my head looks like your happy with it.
 
Its a fair point, but exactly why it’s got that extra Velcro strap. The unit is 1.5kg, my rudimentary shear out test topped out at 15kg load & assuming 5G loading i’ve a 2:1 safety factor for accidental detachment.

severity x detection x occurrence = RPN (Risk)

Fire (delay access) = 9 x 9 x 3 = 243

Collision (detachment) = 6 x 6 x 3 = 108

For the time being (having just installed electrics) I would rather have the FE close to hand than worry about a collision - But each to their own.

View attachment 196532
This looks technically spot on, haven’t a clue what it all means though!
 
This looks technically spot on, haven’t a clue what it all means though!
It means we are all learning - and I’ve a
I was thinking more about the screws in shear load. Not my head looks like your happy with it.
i didn’t check the bolt load capacity for shear as expected it to be huge in comparison, but I now have….and it’s fine.

Always worth checking & accepting questions - thank you for doing so.

A9C9FB05-C4D8-4644-902A-1B6E6C1AE911.jpeg
 
And it’s Friday - so a little post work work before cooking birthday supper for a dear friend. Thankfully the solar panels have arrived (100w Renogy flex to keep height down) & so it’s on with figuring out where to route the cables etc.

Simple enough to wire these in series & the MPPT will cope with 24V (which also reduces wire runs) but what a shame to see my pop top installer used so many auto/tech screws :( Seriously I wish I’d done that job myself now seeing the state of a ‘professional’ install.

E64B6D2D-B0CA-4B07-AE42-5E2A3E319CF5.jpeg

DE2435B9-3C6B-4336-B6A8-F00A09F96289.jpeg

C8773E0A-3C47-4D2D-845C-A60457EA2332.jpeg

2444FEDB-476E-42FF-AC6D-E27227C43BA0.jpeg
 
Series or parallel? I have one of those panels and it’s around 24v on its own.
They are stated as 100w 12v panels, so placed in series that’s 24v 200w. I expect to see greater that 24v under load, so I’ve gone 10AWG despite it suggestion 12 AWG. Plus as I might change things around or add to them in time, I hope I’ve future proofed it sufficiently. MPPT is rated to 100V so I’ll monitor things before expanding the array.

Useful explanation for some below:

 
Last edited:
They are stated as 100w 12v panels, so placed in series that’s 24v 200w. II expect to see greater that 24v under load, so I’ve gone 10AWG despite it suggestion 12 AWG. Plus as I might change things around or add to them in time, I hope I’ve future proofed it sufficiently. MPPT is rated to 100V so I’ll monitor things before expanding the array.

Useful explanation for some below:

I remember something about parallel/series from school, it was something to do with electricity and , um, thats it..
 
They are stated as 100w 12v panels, so placed in series that’s 24v 200w. II expect to see greater that 24v under load, so I’ve gone 10AWG despite it suggestion 12 AWG. Plus as I might change things around or add to them in time, I hope I’ve future proofed it sufficiently. MPPT is rated to 100V so I’ll monitor things before expanding the array.

Useful explanation for some below:


I would measure the output voltage under decent sun before you connect them up - 12v seems low compared to other panels.

Pete
 
The rains coming down today :( but I managed to fit PG9 glands directly into the ‘pop’ during a brief rest bite :) - Unfortunately the gland housing I’d purchased would add 50mm to the overall van height & takes me over the 2m limit I’m trying to stick to (since suspension upgrades aren’t in budget)

Regarding the cables, I also purchased spare MC4 connectors as I can’t see how you can fit them without replacing the existing fittings since they lock in place (via the tangs) unless someone knows otherwise?

I’ve also decided to put vinyl down before sikaflex 252 as if ever I want to replace them, I don’t want to end up butchering the gel coat! Another quick calc suggests 0.25m2 bond area per panel & sika 252 has 3MPa tensile strength (EBT is 1.8MPA) - so that should be more than sufficient & if my calculations are wrong, the T6 community will learn from my mistake.

Finally I can’t find any minimum bond thickness, but YouTube’s campervibe video showed installers using tile spacers - 2mm seams reasonable for a minimum gap unless others have a view?

All comments welcome

D77E5EFE-CD29-4098-8354-99D66D527A7E.jpeg


850761A4-9A06-47FC-BE86-F7D0D63E46F2.jpeg

A0653507-6E2C-4B74-A642-3B7E3AD2A4B1.jpeg

7F574524-F464-4D34-8DCA-E1FD1022C5C5.jpeg
 
Last edited:
Back
Top