You are using an out of date browser. It may not display this or other websites correctly.
You should upgrade or use an alternative browser.
You should upgrade or use an alternative browser.
Valence U27-12XP Lifepo4 Lithium Battery -- How We Done It --
- Thread starter Dellmassive
- Start date
It’s RJ12 on a Victron BMV-712, mine was also too long, I bought a shorter cable on Ebay, various available


6P6C RJ12 - RJ12 DATA LEAD CABLE - LENGTHS 1m 2m 3m 4m 5m - | eBay
This cable has RJ12 connectors on both end (known as 6P6C). RJ12 - RJ12 PATCH LEAD CABLE 6 WIRE RJ - VARIOUS LENGTHS. RJ12 (6 Wire) to RJ12 (6 Wire) cable - various length. RJ12 (6 Wire) to RJ12 (6 Wire) cable - STRAIGHT CABLE.
www.ebay.co.uk
Thanks @DXX for the prompt reply. I will get one on order.It’s RJ12
Hi – Some updates to my Valence install (under single passenger seat). I had originally written a fairly in-depth walk through of my steps for this, but tried to save it as a draft halfway through and it failed to recover when I came back to it. I'll be dammed if I'm typing it all out again, so here's a slimmed down version...
To secure mine under the seat, I've used two 'braces' in front and behind the battery, then secured with 2x battery retaining straps.
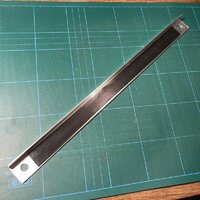
The braces are made from aluminium angle lengths – readily available from DIY stores, or in my case, recycled from the step edges of my van's factory ply lining.
The black areas are self adhesive rubber strips I purchased from eBay – mainly to help grip the battery and minimise vibration, etc. It's about 3mm thick...


In order to maximise the height above the battery – allowing optimum airflow and clearance for my Sportscraft swivel, I wanted the battery to sit as low as possible within the base.
To achieve this, and provide a more solid fixing surface for my battery braces, I used an angle grinder to remove the lipped edges – found near the four main bolts for the seat base. This also got rid of the bloody sharp edges that I seamed to lacerate my hands on every time I went near them.
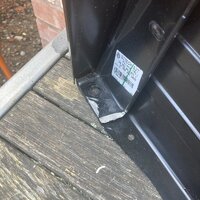
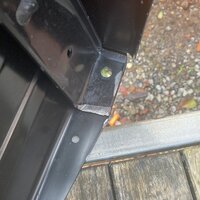
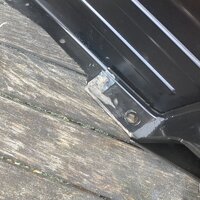
Cleaned-up and re-sprayed with some satin black Hammerite...
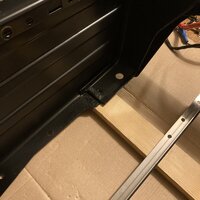
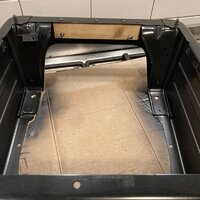
Here's the braces bolted onto the seat base:
Note – the battery only sits on the brace behind the battery, with the front one acting as a 'stop' – preventing the battery from moving forward...
Most of the battery weight is actually supported by the van floor – If you look closely, you can see that I've notched-out a section on both sides, just in front of the front brace – allowing the battery to rest on the rubber matting of the van floor. Again, this was in the interests of allowing as much space as possible above it.

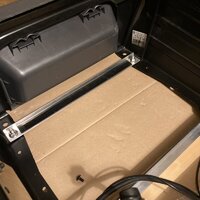
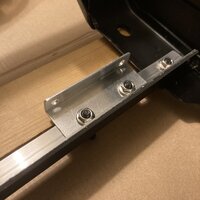
I added two small adjustable angle brackets either side of the base to act as side stops, preventing side-to-side movement of the battery when in transit.
Again, some self adhesive rubber was added to these for surface protection/grip.
You can also see the two buckled, retaining straps in the image below:

I then made a mount for my battery kill switch – to be attached to the front brace – again, this was made using the aluminium angle strip.
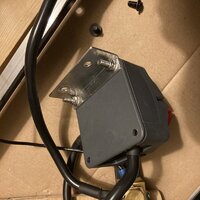

On the side, I attached my main loads out fuse holder, just before the Victron battery protect.

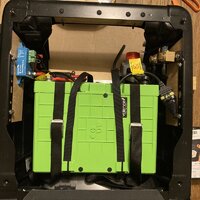
Here's a shot with the battery in place and secured with the straps... My DC/DC charger isn't mounted in this image, but that attaches to the front end of the seat base... you can see the bolts sticking out below.
That's it for now, hope this may help others looking for a similar solution
To secure mine under the seat, I've used two 'braces' in front and behind the battery, then secured with 2x battery retaining straps.
The braces are made from aluminium angle lengths – readily available from DIY stores, or in my case, recycled from the step edges of my van's factory ply lining.
The black areas are self adhesive rubber strips I purchased from eBay – mainly to help grip the battery and minimise vibration, etc. It's about 3mm thick...


In order to maximise the height above the battery – allowing optimum airflow and clearance for my Sportscraft swivel, I wanted the battery to sit as low as possible within the base.
To achieve this, and provide a more solid fixing surface for my battery braces, I used an angle grinder to remove the lipped edges – found near the four main bolts for the seat base. This also got rid of the bloody sharp edges that I seamed to lacerate my hands on every time I went near them.


Cleaned-up and re-sprayed with some satin black Hammerite...


Here's the braces bolted onto the seat base:
Note – the battery only sits on the brace behind the battery, with the front one acting as a 'stop' – preventing the battery from moving forward...
Most of the battery weight is actually supported by the van floor – If you look closely, you can see that I've notched-out a section on both sides, just in front of the front brace – allowing the battery to rest on the rubber matting of the van floor. Again, this was in the interests of allowing as much space as possible above it.


I added two small adjustable angle brackets either side of the base to act as side stops, preventing side-to-side movement of the battery when in transit.
Again, some self adhesive rubber was added to these for surface protection/grip.
You can also see the two buckled, retaining straps in the image below:

I then made a mount for my battery kill switch – to be attached to the front brace – again, this was made using the aluminium angle strip.


On the side, I attached my main loads out fuse holder, just before the Victron battery protect.

Here's a shot with the battery in place and secured with the straps... My DC/DC charger isn't mounted in this image, but that attaches to the front end of the seat base... you can see the bolts sticking out below.

That's it for now, hope this may help others looking for a similar solution
Last edited:
Nice job @ched
Are you not concerned that you have changed the integral strength of the seat base? The folded upturns next to the base securing bolts make a substantial difference to the strength of the securing points. In a crash impact, the bolts have to keep the seat base secured to the floor chassis. There is a lot of leverage with the weight of a human sat it the seat.
I personally would not go down that route. I spaced the battery over the folded edges but you do loose height because of them.
I used an angle grinder to remove the lipped edges – found near the four main bolts for the seat base.
Are you not concerned that you have changed the integral strength of the seat base?
I personally would not go down that route. I spaced the battery over the folded edges but you do loose height because of them.
Last edited:
Are you not concerned that you have changed the integral strength of the seat base?
Thanks @Dilbert
The thought has crossed my mind, but it doesn't concern me. I've only removed a minimal amount and none of the spot welds have been compromised in any way. Time will tell, but will obviously check in the future for signs of stress in that area.
Evening fellow Valance owners...
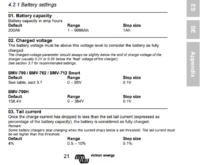
Could anybody with a Victron BMV-712 in their setup, please advise on the following settings?
Battery Capacity:
Should this be set to 138ah? Or whatever the Valence software is showing when 100% full - taking into account the lost capacity due to age?
Battery Charged Voltage:
The manual states this should be set 0.2 - 0.3 volts below the float charge voltage of the mains charger (which is 13.8v) so should the setting on the BMV-712 be 13.6?
Discharge Floor:
The default is 50% but should this be lower for lithium?
Charge Efficiency Factor:
Default is 95% - do we leave as is?
@Dilbert, @Dellmassive what have you guys got for the above?
Thanks in advance -
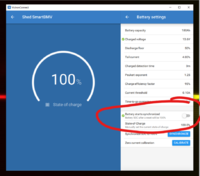
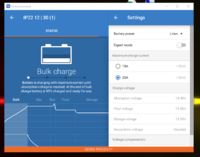
this is the "Victron connect" demo default settings page for the 12/30A charger: showing 13.8v float, so 13.6v is fine.
+*+*+*
and an example of the demo of a BMV712:

+**+*+*+*+*+
Could anybody with a Victron BMV-712 in their setup, please advise on the following settings?
Battery Capacity:
Should this be set to 138ah? Or whatever the Valence software is showing when 100% full - taking into account the lost capacity due to age? - yes set to the full capacity of 138ah, or 130ah accounting for a slight drop in capacity from new.
Battery Charged Voltage:
The manual states this should be set 0.2 - 0.3 volts below the float charge voltage of the mains charger (which is 13.8v) so should the setting on the BMV-712 be 13.6? - yes 13.6v is fine
Discharge Floor:
The default is 50% but should this be lower for lithium? - 50% discharge floor is for SLA batteries, Lithium's you can use the full 100%, so set at 75-100% depending on how low you want to run the battery
Charge Efficiency Factor:
Default is 95% - do we leave as is? - yes, i did (edit: Victron recommend 99% for Lithium batterys)
edit: note : Victron recommend Peukert Exp` to be set at 1.05
+*+*+*+*+
see here for more info: (just a google search for: bmv712 lithium settings)
and here: bmv712 lithium settings - Google Search
...
...
...
...


+*+*+*
and an example of the demo of a BMV712:

+**+*+*+*+*+
Could anybody with a Victron BMV-712 in their setup, please advise on the following settings?
Battery Capacity:
Should this be set to 138ah? Or whatever the Valence software is showing when 100% full - taking into account the lost capacity due to age? - yes set to the full capacity of 138ah, or 130ah accounting for a slight drop in capacity from new.
Battery Charged Voltage:
The manual states this should be set 0.2 - 0.3 volts below the float charge voltage of the mains charger (which is 13.8v) so should the setting on the BMV-712 be 13.6? - yes 13.6v is fine
Discharge Floor:
The default is 50% but should this be lower for lithium? - 50% discharge floor is for SLA batteries, Lithium's you can use the full 100%, so set at 75-100% depending on how low you want to run the battery
Charge Efficiency Factor:
Default is 95% - do we leave as is? - yes, i did (edit: Victron recommend 99% for Lithium batterys)
edit: note : Victron recommend Peukert Exp` to be set at 1.05
+*+*+*+*+
see here for more info: (just a google search for: bmv712 lithium settings)
and here: bmv712 lithium settings - Google Search
...
...
...
...

Brilliant. Thanks @Dellmassive that’s great!
Could anybody with a Victron BMV-712 in their setup, please advise on the following settings?
Battery Capacity:
Should this be set to 138ah? Or whatever the Valence software is showing when 100% full - taking into account the lost capacity due to age?
I have set to 130Ah (the rated 144Ah capacity -10% for aging)
Battery Charged Voltage:
The manual states this should be set 0.2 - 0.3 volts below the float charge voltage of the mains charger (which is 13.8v) so should the setting on the BMV-712 be 13.6?
I am using the default Lithium profile so have it set at 13.3V (13.5V float/storage)
Discharge Floor:
The default is 50% but should this be lower for lithium?
I set to 5% (it works the opposite way to how @delmassive showed) The discharge floor is for calculating "Time-to-Go" / "Time remaining".
Charge Efficiency Factor:
Default is 95% - do we leave as is?
I set to 99%
I have also set:
'Tail current' to 0.50%
'Charge detection time' to 30m (to prevent solar charge variations affecting readings (averages out over longer period)
'Current threshold' to 0.10A
'Time-to-go averaging period' to 12m (to prevent solar charge variations affecting readings (averages out over longer period)
And, as @Dellmassive pointed out, the 'Peukert Exponent' should be set at 1.05
more info:

 diysolarforum.com
The setting you request are attached below. (Battle Born Battery)
01 Battery Capacity — 100AH *
02 Charged Voltage — 14.2v *
03 Discharge Floor 0%
03 Tail Current — 4.0%
04 Charged Detection — 03
05 Puekert Exponent — 1.05 *
06 Charge Efficiency Factor — 99% *
07 Current Threshold — 0.10A
08 Time to Go Averaging Period — 03
09 Zero Current Calibration — ZERO
10 Synchronize — SYNC
11 Relay Mode – DFLT
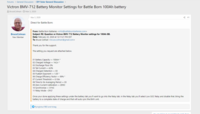

Victron BMV-712 Battery Monitor Settings for Battle Born 100Ah battery
Direct for Battle Born: From: Battle Born Batteries Subject: RE: Question re Victron BMV-712 Battery Monitor settings for 100Ah BB. Date: February 22, 2020 at 12:11:21 PM EST To: Bruce Colman Thank you for the support. The setting you request are attached below. 01 Battery Capacity —...
 diysolarforum.com
The setting you request are attached below. (Battle Born Battery)
01 Battery Capacity — 100AH *
02 Charged Voltage — 14.2v *
03 Discharge Floor 0%
03 Tail Current — 4.0%
04 Charged Detection — 03
05 Puekert Exponent — 1.05 *
06 Charge Efficiency Factor — 99% *
07 Current Threshold — 0.10A
08 Time to Go Averaging Period — 03
09 Zero Current Calibration — ZERO
10 Synchronize — SYNC
11 Relay Mode – DFLT

Thanks again @Dilbert @Dellmassive.
@Dilbert - re: charged voltage of 13.5v – thanks for pointing this out, I originally had it set at 13.6v as I was going off the settings in the demo, which had the float charge at 13.8v.
Interesting that the demo for my charger (IP67 12/15) has different default Lithium settings to the actual product? Perhaps the default settings have been tweaked through a software/firmware update, but not updated in the demo?
I charged my battery for the first time last night. It’s been sitting at about 96% SOC since I collected it in the summer. I did this with the Valence software connect so I see what was going on.
Observations -
Before charging, all cells were well balanced, they stayed like this until the battery voltage hit ~14v, unexpectedly, at 14v the cells quickly started to unbalance.
When the Cell Spread was around 40/50mV - the software indicated that balancing had been activated.
What surprised me most, is that the cells didn’t complete balancing before the charger reached capacity/float voltage and remain slightly out on Cell 1 (25mV Cell Spread).
I don’t think this is an issue, it may be that the battery needs a few cycles or used with loads/draw to even itself out further.
Final note - I hooked up the Valance software again this morning, and the Cell Spread had reduced further to 13mV - again, this is unexpected as It wasn’t connected to the software/USB overnight?
Apologies for the waffle, and I should have taken some screenshots of the process, but just wanted to share my ‘first-charge’ experience...
Interesting that the demo for my charger (IP67 12/15) has different default Lithium settings
I have also noticed this. Some of the screen shots are wrong too. They sometimes do not keep in step with the software and firmware updates.
What surprised me most, is that the cells didn’t complete balancing before the charger reached capacity/float voltage
I modified the Arduino based Master BMS I have built - that keeps the cell block balancing active (based on this one from seb303: seb303/Arduino-XP-BMS) - to indicate when the battery is in Balancing mode and also to count how may times Balancing is active. It is early days as I have only recently finalised the software and completed the physical installation.
The battery manual states that Balancing is active on cells above 3.360V and greater than 40mV above the lowest cell. I have observed Balancing taking place at the top end of a charge cycle but also at the bottom end of the charge cycle once the voltages rise and the above conditions are met. Also note that Balancing can also be triggered and active when NOT charging - I have observed this once already when the discharge current was very low in van storage mode. The Balance count will be interesting to monitor over the coming months during multiple charge and discharge cycles.
Charged voltage..
I see the Nominal Voltage for the Valance U27-12XP is 12.8V so that is why I went for the higher end of the suggested range at 13.3V (13.5V - 0.2V) rather than - 0.3V. It is very marginal though!
Well thanks guys @ched @Dilbert @Dellmassive . please keep the info coming on this thread. I really don't think i could do this without it!! Thinking that going lithium would be easy -No. Luckily i am a few steps behind you guys and can't go much further as I am waiting for Ablemail to launch their bluetooth module for lithium profiles on my b2b. Its a tight fit getting everything under the seat.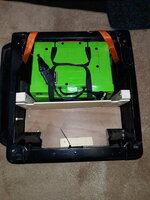


I've got covers for the +ve bus bar and the other terminals.


I've got covers for the +ve bus bar and the other terminals.
Similar threads
- Replies
- 13
- Views
- 2K
- Replies
- 90
- Views
- 6K
- Replies
- 102
- Views
- 13K
- Replies
- 66
- Views
- 8K

